Crochet Granny Stitch V Neck Vest Top – Free pattern

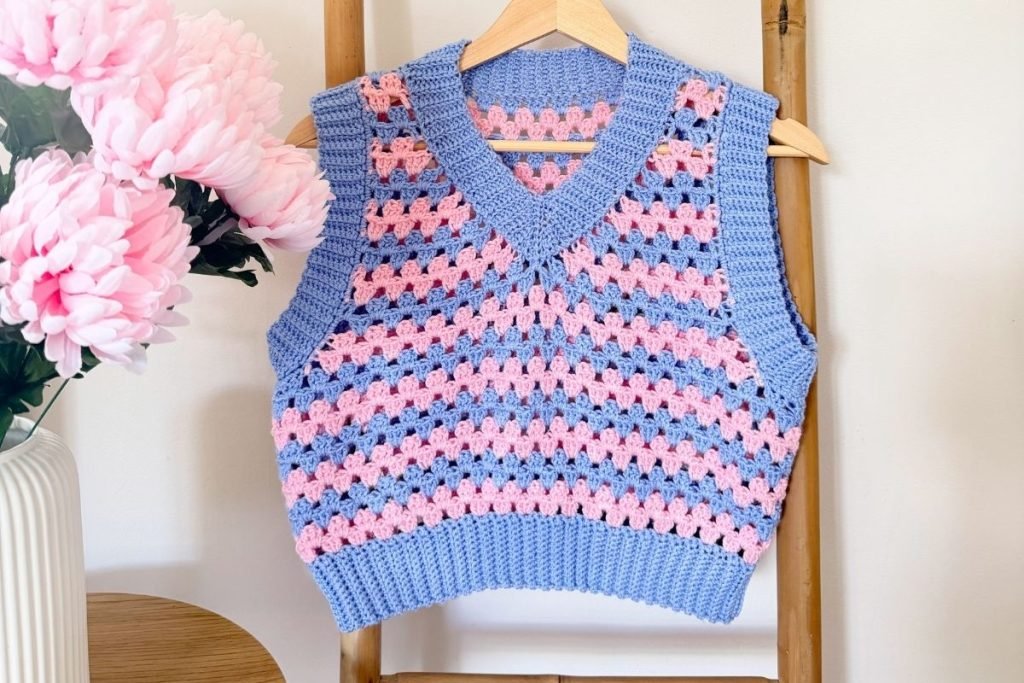
Create a stylish handmade layer with this free crochet granny stitch vest top pattern. Featuring a flattering V-neckline, classic granny stitch texture and beautifully finished ribbed edges, this sleeveless top is a versatile addition to your handmade wardrobe.
The vest is crocheted using DK yarn and features a relaxed fit that’s perfect for layering over shirts, dresses or simple tops. The combination of soft granny stitch fabric and structured ribbing gives the design a modern look while keeping its traditional crochet charm.
Worked from the bottom up in two separate panels, this crochet vest pattern is suitable for confident beginners looking to develop their garment making skills. The ribbed armholes and shaped V-neckline add a professional finish and I’ve included a video tutorial to guide you through the neckline construction.
Crochet Granny Stitch Vest Top at a Glance
- Skill level: Easy to Intermediate
- Sizes: S (M/L, XL/2XL)
- Finished fit: Relaxed
- Yarn Weight: DK (Weight 3)
- Yarn: Paintbox Anti Pilling DK
- Hook Sizes: 4 mm and 5 mm
- Construction: Two panels, worked bottom up and seamed together
- Special Features: Granny stitch fabric, ribbed hem, armholes and V-neckline
PROJECT OVERVIEW
This crochet granny stitch V-neck vest top is constructed from two separate panels, worked from the bottom up. Each panel begins with a ribbed hem before transitioning into the classic granny stitch pattern. Once completed, the front and back panels are seamed together to form the body of the vest.
The armholes are finished with crochet ribbing created by alternating rows of yarn over slip stitches and regular slip stitches. This technique produces a stretchy, knit-like texture that gives the vest a neat, structured finish.
The V-neckline is completed using short row ribbing to create a distinctive shape. If you’re unfamiliar with this technique, I’ve included a Youtube tutorial demonstrating the neckline construction step by step.
WHY I DESIGNED THIS CROCHET V NECK VEST TOP
I wanted to create a crochet granny stitch vest top that combined the charm of a traditional crochet stitch with a fresh, modern design. I’ve always loved the versatility of the granny stitch and I though it would be perfect for a colourful, comfortable vest that could be worn throughout the year.
For this design, I chose two contrasting colors alternating them every two rows to create soft horizontal stripes. I love how such a simple color change can completely transform the appearance of granny stitch fabric. You could easily personalize this vest with your favorite color combinations, from bright, playful shades to subtle neutrals.
One of my favorite details is the ribbed V-neckline. I wanted to experiment with short row shaping to create a neatly defined neckline with a knitted appearance. I was delighted with how the finished ribbing complimented the granny stitch body.
The result is a crochet vest top that brings together traditional stitches, playful color and thoughtful finishing details in a design that’s both practical and enjoyable to make.

Why You’ll Love This Crochet Granny Stitch Vest Top
- Classic granny stitch design: Traditional granny stitch clusters create a beautiful textured fabric with timeless appeal.
- Colorful striped pattern: Alternating colors every two rows creates eye catching stripes with plenty of opportunities to experiment with your favorite shades.
- Comfortable, relaxed fit: The sleeveless design is ideal for layering over T-shirts, blouses or dresses.
- Beautiful ribbed finishing: The hem, armholes and shaped V-neckline feature neat ribbing that gives the vest a polished, knit like appearance.
- Easy construction: The front and back panels are worked separately and seamed together, while the accompanying neckline video tutorial helps guide you through the short row shaping.
YARN
For this crochet granny stitch vest top I used Paintbox Anti Pilling DK, a 100% acrylic yarn that creates a soft, comfortable fabric with lovely stitch definition.
Yarn Details:
- Yarn: Paintbox Anti Pilling DK
- Weight: DK (Weight 3)
- Ball Size: 100 g / 250 m / 273 yds
- Fiber Content: 100% acrylic
Yarn Substitutes:
You can substitute another DK weight yarn with a similar gauge and drape. Some alternatives to consider include King Cole Baby DK, Stylecraft Bambino DK, and Stylecraft Bellissima DK.
MATERIALS NEEDED
- Dk weight yarn in your chosen main and contrast colors
- 4 mm crochet hook
- 5 mm crochet hook
- Stitch markers (optional)
- Scissors
- Yarn needle for sewing seams and weaving in ends.
STITCHES & ABBREVIATIONS
- ch – chain
- sc – single crochet
- dc – double crochet
- yoslst – yarn over slip stitch
- blo – back loop only
- slst – slip stitch
- sp – space
- st(s) – stitch(es)
- rep – repeat
- MC – main color
- CC – contrasting color
Gauge
4.5 granny stitch clusters x 9 rows = 4 inches (10 cm)
Checking your gauge before beginning is important, particularly when making a garment. If your gauge differes from the pattern your finished vest may be larger or smaller than intended.
PROJECT TIPS
- Changing colors: When switching between your main color and contrast color, change yarn before completing the final stitch of the previous color. This creates a cleaner transition between stripes.
- Carrying yarn: Carry your unused yarn neatly up the sides of the panels when changing colors. This reduces the number of ends you’ll weave in later.
- Keep your ribbing relaxed: Avoid working your slip stitches too tightly especially when crocheting into the back loops. Maintaining a relaxed tension will make the ribbing easier to work and help preserve its stretch.
- Adjusting the fit: If your vest is coming out too large check your gauge and finished measurements before adjusting your hook size.
- Blocking your finished vest: Blocking can help even out your stitches and give your garment a polished finish.
CROCHET GRANNY V NECK VEST TOP PATTERN
SIZING: S(M/L and XL/2XL)
Finished bust: 36(40, 45)”
Scroll down for larger sizes
Size Small
Back Panel
Ribbed Hem
Using the smaller hook and using MC
**Ch 13
Row 1: sc in 2nd ch from hook and in each ch across, turn. [12 sts]
Row 2: ch 1, scblo in each st across turn.
Rep row 2 until you have a total of 64 rows
Granny Stitch Body
Now we will be working along the edges of the rows we just completed. Turn your ribbing so you are working on the long edge of the hem. To make things simpler to read we will revert back to row 1:
Setup row: ch 1, work 1 sc into the edges of each row you just completed. Change to CC before you finish the last sc. From now on there will be no mention of any color changes in the pattern. For this vest I did 2 rows of granny stitch in each color.[64 sts]
Change to larger hook
Row 1: Ch 2 (counts as 1st dc here and throughout), dc in same st, skip 2 sts, *3dc into the next st, skip 2, rep from * across ending with 2dc in last st, turn.
Row 2: ch 2, 3dc in sp between each cluster across, ending the row with a dc on top of the ch 2, turn
Row 3: ch 2, dc in 1st sp, 3dc in sp between each cluster across, ending with a dc in sp between last 3dc cluster and the ch2, then, dc on top of the ch 2, turn
Row 4: ch 2, 3dc in sp between each cluster across, ending with a dc on top of the ch 2, turn.
Rep rows 3-4 until you have a total of 10 granny stitch rows. Add more rows here if you want the top longer. This should be held under the arm to check length needed. Fasten off and make sure you have turned after your last row.
Armhole Shaping
We will now revert back to row 1 again to make the pattern simpler for you to read:
Looking at the righthand side of the top, skip 7 dc and attach yarn in the sp between the 2nd & 3rd clusters
Row 1: ch 2, 3dc in next cluster sp and in each of the next 15 cluster sps, dc in next cluster sp, turn.
Row 2: ch 2, skip 1st sp, 3dc in each cluster sp across [15 clusters] dc on top of ch 2, turn.
Row 3: rep row 2. You should now have a total of 14 clusters, turn.***
Row 4: ch 2, dc in same sp, 3dc in each cluster sp across, (13 clusters), ending with a dc on top of ch 2, turn.
Rep row 4 until you have a total of 15 rows completed, counting from Row 1. Fasten off
Front Panel
Rep as for back panel from ** to ***
Row 4: ch 2 dc in same p, 3dc in each of the next 6 sps, dc in next sp, turn.
Row 5: ch 2, skip 1st sp, 3dc in each sp across (6 clusters), dc on top of ch 2, turn.
Row 6: ch 2, dc in same sp, 3dc in each sp (5 clusters), dc on top of ch 2, turn.
Row 7: ch 2, skip 1st sp, 3dc in each sp (5 clusters), dc on top of ch 2, turn.
Row 8: ch 2, dc in same sp, 3dc in each sp across (4 clusters), dc on top of ch 2, turn.
Row 9: ch 2, skip 1st sp, 3dc in each sp (4 clusters), dc on top of ch 2, turn.
Row 10: ch 2, dc in same sp, 3dc in each sp (3 clusters) dc on top of ch 2, turn.
Row 11: ch 2, skip 1st sp, 3dc in each sp (3 clusters) dc on top of ch 2, turn.
Row 12: ch 2, dc in same sp, 3dc in each of the next 2 sps, dc on top of ch 2, turn.
Row 13: ch 2, skip 1st sp, 3dc in each of the next 2 sps, dc on top of ch 2, turn.
Row 14: ch 2, dc in same sp, 3dc in next sp, dc on top of ch 2, turn.
Row 15: ch 2, dc in same sp, 3dc in next sp, dc on top of ch 2, turn.
Row 16: ch 2, dc in same sp, 3dc in next sp, dc on top of ch 2, turn.
Row 17: ch 2, dc in same sp, 3dc in next sp, dc on top of ch 2, turn.
Other Side
Attach yarn to same sp as last dc created on row 4
Row 1: ch 2, 3dc in next sp and each sp across (6 clusters), dc in last sp, dc on top of ch 2, turn.
Row 2: ch 2, 3dc in each sp across (6 clusters), dc on top of ch 2, turn.
Row 3: ch 2, skip 1st sp, 3dc in each sp (5 clusters), dc in last sp, dc on top of ch 2, turn.
Row 4: ch 2, 3dc in each sp (5 clusters), dc on top of ch 2, turn.
Row 5: ch 2 skip 1st sp, 3dc in each sp (4 clusters) dc in last sp, dc on top of ch 2, turn.
Row 6: ch 2, 3dc in each sp across (4 clusters) dc on top of ch 2, turn.
Row 7: ch 2, skip 1st sp, 3dc in each sp (3 clusters), dc in last sp, dc on top of ch 2, turn.
Row 8: ch 2, 3dc in each sp (3 clusters), dc on top of ch 2, turn.
Row 9: ch 2, skip 1st sp, 3dc in each of next 2 sps , dc in last sp, dc on top of ch 2, turn.
Row 10: ch 2, 3dc in each of the next 2 sps, dc on top of ch 2, turn.
Row 11: ch 2, dc in same sp, 3dc in next sp, dc in last sp, dc on top of ch 2, turn.
Row 12: ch 2, 3dc in each of the next 2 sps, dc on top of ch 2, turn.
Row 13: ch 2, dc in same sp, 3dc in next sp, dc in last sp, dc on top of ch 2, turn.
Row 14: ch 2, dc in same sp, 3dc in next sp, dc on top of ch 2, turn.
Size Medium/Large
Back Panel
Ribbed Hem
Using the smaller hook
** Ch 13
Row 1: sc in the 2nd ch from the hook and in each ch across, turn.
Row 2: ch 1, scblo in each st across, turn.
Rep row 2 until you have a total of 67 rows.
Now we will be working along the edges of the rows we just completed. Turn your ribbing so you are working on the long edge of the hem. To make things simpler to read we will revert back to row 1:
Setup row: ch 1, work 1 sc into the edges of each row you just completed. Change to CC before you finish the last sc. From now on there will be no mention of any color changes in the pattern. For this vest I did 2 rows of granny stitch in each color.[67 sts]
Change to larger hook
Row 1: Ch 2 (counts as 1st dc here and throughout), dc in same st, skip 2 sts, *3dc into the next st, skip 2, rep from * across ending with 2dc in last st, turn.
Row 2: ch 2, 3dc in sp between each cluster across, ending the row with a dc on top of the ch 2, turn
Row 3: ch 2, dc in 1st sp, 3dc in sp between each cluster across, ending with a dc in sp between last 3dc cluster and the ch2, then, dc on top of the ch 2, turn
Row 4: ch 2, 3dc in sp between each cluster across, ending with a dc on top of the ch 2, turn.
Rep rows 3-4 until you have a total of 12 granny stitch rows for Medium and 14 granny stitch rows for Large. Add more rows here if you want the top longer. This should be held under the arm to check length needed. Fasten off and make sure you have turned after your last row.
Armhole Shaping
We will now revert back to row 1 again to make the pattern simpler for you to read
Looking at the righthand side of the top, skip 7 dc and attach yarn in the sp between the 2nd & 3rd clusters
Row 1: ch 2, 3dc in next cluster sp and each of the next 16 cluster sps, dc in next cluster sp, turn
Row 2: ch 2, skip 1st sp, 3dc in each cluster sp across (16 clusters), dc on top of ch 2, turn.
Row 3-4: rep row 2. You should have a total of 14 cluster at the end of row 4***
Row 5: ch 2, dc in same sp, 3dc in each cluster sp across (13 clusters), dc in last sp, dc on top of ch 2, turn.
Row 6: ch 2, 3dc in each cluster sp across, (14 clusters), dc on top of ch 2, turn.
Row 7: ch 2, dc in same sp, 3dc in each cluster sp across (13 clusters), dc in last sp, dc on top of ch 2, turn.
Rep rows 6 -7 until you have a total of 17 rows for Medium and 19 for Large completed, counting from row 1 of armhole shaping. Fasten off.
Front Panel
Rep as for back panel from ** to ***
Row 5: Ch 2, dc in same st, 3dc in each sp (6 clusters), dc in next sp, turn
Row 6: Ch 2, skip 1st sp, 3dc in each sp (6 clusters), ending with a dc on top of ch 2. turn.
Row 7: ch 2, dc in same sp, 3dc in each sp across, (5 clusters) ending with a dc on top of ch 2, turn
Row 8: Ch 2, skip 1st sp, 3dc in each sp across, (5 clusters) ending with a dc on top of ch 2, turn.
Row 9: ch 2, dc in same sp, 3dc in each sp across, (4 clusters) ending with a dc on top of ch 2, turn.
Row 10: ch 2, skip 1st sp, 3dc in each sp (4 clusters) ending with a dc on top of ch 2, turn.
Row 11: ch 2, dc in same sp, 3dc in each sp across (3 clusters) ending with dc on top of ch 2
Row 12: ch 2, skip 1st sp, 3dc in each sp across, (3 clusters) ending with dc on top of ch 2
Row 13: ch 2, dc in same sp, 3dc in each sp (2 clusters), ending with dc on top of ch 2
Row 14: ch 2, skip 1st sp, 3dc in each sp (2 clusters), ending with a dc on top of ch 2
Row 15: ch 2, dc in same sp, 3dc in next sp, dc in next sp, dc on top of ch 2
Row 16: ch 2, 3dc in each of the next 2 sps, dc on top of ch 2.
Row 17: ch 2, dc in same sp, 3dc in next sp, dc in next sp, dc on top of ch 2, turn. Stop here for medium size and fasten off leaving long tail.
Row 18: ch 2, 3dc in each of the next 2 sps, dc on top of ch 2, turn.
Row 19: ch 2, dc in same sp, 3dc in next sp, dc in next sp, dc on top of ch 2, turn. Fasten off leaving a long tail
Other Side
Attach yarn to same sp as last dc created on row 5
Row 1: Ch 2, 3dc in each sp (6 clusters), ending with a dc in last sp and dc on top of ch 2
Row 2: ch 2, 3dc in each sp across (6 clusters) ending with dc on top of ch 2, turn.
Row 3: ch 2, skip 1st sp, 3dc in each sp across (5 clusters) ending with dc in last sp, dc on top of ch 2
Row 4: ch 2, 3dc in each sp (5 clusters) ending with dc on top of ch 2
Row 5: ch 2, skip 1st sp, 3dc in each sp (4 clusters), dc in last sp, dc on top of ch 2
Row 6: ch 2, 3dc in each sp (4 clusters) ending with dc on top of ch 2
Row 7: ch 2, skip 1st sp, 3dc in each sp (3 clusters) ending with dc in last sp and a dc on top of ch 2
Row 8: ch 2, 3dc in each sp (3 clusters) ending with dc on top of ch 2
Row 9: ch 2, skip 1st sp, 3dc in each of the next 2 sps, dc in last sp, dc on top of ch 2
Row 10: ch 2, 3dc in each of the next 2 sps, dc on top of ch 2
Row 11: ch 2, dc in same sp, 3dc in next sp, dc in last sp, dc on top of ch 2
Row 12: ch 2, 3dc in each of the next 2 sps, dc on top of ch 2
Row 13: ch 2, dc in same sp, 3dc in next sp, dc in last sp, dc on top of ch 2. Stop here for Size Medium. Fasten off leaving long tail.
Row 14: ch 2, 3dc in next 2 sps, dc on top of ch 2, turn
Row 15: ch 2, dc in same sp, 3dc in next sp, dc in last sp, dc on top of ch 2, turn.
Size XL/2XL
Back Panel
Ribbed Hem
Using the smaller hook
** Ch 13
Row 1: sc in the 2nd ch from the hook and in each ch across, turn.
Row 2: ch 1, scblo in each st across, turn.
Rep row 2 until you have a total of 73 rows.
Now we will be working along the edges of the rows we just completed. Turn your ribbing so you are working on the long edge of the hem. To make things simpler to read we will revert back to row 1:
Setup row: ch 1, work 1 sc into the edges of each row you just completed. [73 sts]. Change to CC before you finish the last sc. From now on there will be no mention of any color changes in the pattern. For this vest I did 2 rows of granny stitch in each color.
Change to larger hook
Row 1: Ch 2 (counts as 1st dc here and throughout), dc in same st, skip 2 sts, *3dc into the next st, skip 2, rep from * across ending with 2dc in last st, turn.
Row 2: ch 2, 3dc in sp between each cluster across, ending the row with a dc on top of the ch 2, turn
Row 3: ch 2, dc in 1st sp, 3dc in sp between each cluster across, ending with a dc in sp between last 3dc cluster and the ch2, then, dc on top of the ch 2, turn
Row 4: ch 2, 3dc in sp between each cluster across, ending with a dc on top of the ch 2, turn.
Rep rows 3-4 until you have a total of 16 granny stitch rows. Add more rows here if you want the top longer. This should be held under the arm to check length needed. Fasten off and make sure you have turned after your last row.
Armhole Shaping
We will now revert back to row 1 again to make the pattern simpler for you to read
Looking at the righthand side of the top, skip 10 dc and attach yarn in the sp between the 3rd and 4th clusters
Row 1: ch 2, skip 1st cluster sp, 3dc in next cluster sp and in each of the next 16 clusters, dc in next cluster sp, turn.
Row 2: ch 1, skip 1st sp, 3dc in each cluster sp across (16 clusters), dc on top of ch 2, turn.***
Row 3: ch 2, dc in same sp, 3dc in each cluster sp across (15 clusters), dc in next sp, dc on top of ch 2, turn
Row 4: ch 2, 3dc in each cluster sp across (16 clusters), dc on top of ch 2, turn
Row 5: ch 2, dc in same sp, 3dc in each cluster sp across (15 clusters), dc in next sp, dc on top of ch 2, turn.
Rep rows 4-5 until you have a total of 19 rows, counting from row 1. Fasten off.
Front Panel
Rep as for the back panel from ** to **
Row 3: ch 2, dc in same sp, 3dc in each sp across (7 clusters) dc in next sp, turn.
Row 4: ch 2, skip 1st sp, 3dc in each sp across, (7 clusters) ending with a dc on top of ch 2, turn
Row 5: ch 2, dc in same sp, 3dc in each sp across, (6 clusters), ending with a dc on top of ch 2, turn
Row 6: ch 2, skip 1st sp, 3dc in each sp across (6 clusters) ending with dc on top of ch 2, turn.
Row 7: ch 2, dc in same sp, 3dc in each sp across (5 clusters) ending with dc on top of ch 2, turn.
Row 8: ch 2, skip 1st sp, 3dc in each sp across (5 clusters) ending with dc on top of ch 2, turn.
Row 9: ch 2, dc in same sp, 3dc in each sp across (4 clusters) ending with dc on top of ch 2, turn.
Row 10: ch 2, skip 1st sp, 3dc in each sp across (4 clusters) ending with dc on top of ch 2, turn.
Row 11: ch 2, dc in same sp, 3dc in each sp across (3 clusters) ending with dc on top of ch 2, turn.
Row 12: ch 2, skip 1st sp, 3dc in each sp across (3 clusters), dc on top of ch 2, turn.
Rows 13-19: ch 2, dc in same sp, 3dc in each of the next 2 sps, dc on top of ch 2, turn. Fasten off leaving a long tail.
Other Side
Attach yarn in same sp as dc from row 3 then
Row 1: ch 2, 3 dc in each sp across, (7 clusters) ending with a dc in last sp and a dc on top of ch 2, turn
Row 2: ch 2, 3dc in each sp across, (7 clusters) ending with a dc on top of ch 2, turn
Row 3: ch 2, skip 1st sp, 3dc in each sp across, (6 clusters) ending with dc in last sp and dc on top of ch 2, turn
Row 4: ch 2, 3dc in each sp across (6 clusters) ending with dc on top of ch 2, turn.
Row 5: ch 2, skip 1st sp, 3dc in each sp (5 clusters) ending with dc in last sp and a dc on top of ch 2, turn.
Row 6: ch 2, 3dc in each sp (5 clusters) ending with a dc on top of ch 2, turn.
Row 7: ch 2, skip 1st sp, 3dc in each sp (4 clusters) ending with dc in last sp and a dc on top of ch 2, turn.
Row 8: ch 2, 3dc in each sp across (4 clusters) ending with a dc on top of ch 2, turn.
Row 9: ch 2, skip 1st sp, 3dc in each sp (3 clusters) ending with a dc in last sp and a dc on top of ch 2, turn.
Row 10: ch 2, 3dc in each sp (3 clusters), ending with a dc on top of ch 2
Row 11: ch 2, skip 1st sp, 3dc in each of the next 2 sps, ending with a dc in last sp, dc on top of ch 2, turn
Row 12-17: ch 2, 3dc in each of the next 2 sps, ending with a dc in last sp, dc on top of ch 2, turn. Fasten off leaving a long tail.
Assembly – All Sizes
lay the back panel on a flat surface with the right side facing upwards. Place the front panel directly on top, with the right side facing downwards, so that the right sides of both panels are facing each other.
Using a yarn needle and yarn, sew the side seams together, beginning at the bottom ribbed hem and working upwards towards the underarm. Fasten off and repeat on the opposite side.
Next, sew the shoulder seams together. Fasten off securely and weave in any remaining ends. Yurn your vest right side out, ready to add the armhole and neckline ribbing.
Armhole Ribbing
Using smaller hook and MC
Setup round: Attach yarn to the underarm. I like to attach to to the centre point of the underarm as possible. Ch 1, sc around the entire armhole, placing 2sc into the edges of every dc row around. Slst to the beginning sc to close the round.
Round 1: ch 9, sc in 2nd ch from the hook and in each of the next 7 chains, slst into each of the next 2 sc, turn.
Round 2: skip the 2 slsts you just created, scblo in each of the next 8 sts, turn.
Round 3: ch 1, scblo in each of the next 8 sts, slst into each of the next 2 sc, turn.
Round 4: ch 1, skip the 2 slsts you just created, scblo in each of the next 8 sts, turn.
Rep rounds 3-4 all the way around the entire armhole. Fasten off leaving a long tail.
With a yarn needle and the long tail seam the two ends of the ribbing together with the wrong side facing outward. If you prefer, you can also slst them together.
Rep this entire process for the 2nd armhole.
Neckline Ribbing
Using the smaller hook and MC
Setup Round: With your vest top turned the right side out, and the back facing you, attach yarn near the right shoulder seam. Once attached, ch 1 and slip stitch across the back neck, down the edge of the inner neckline edge. Place 2 slsts in the edge of every granny stitch row. Work your way in this manner until you reach the centre point of the V. Place a slst in to that and mark it. Now continue up along the other edge of the V. Slst to the 1st slst you made to close the round.
With the front facing you, find where you marked that centre st. Working from that marked stitch towards your left, mark the 8th st with another marker. So now you should have 7 sts between each marker. From where your hook is now and counting from the next stitch you must have an even amount of stitches to the st before the second marker you added. If you don’t have an even number you may have to go back and add another slst.
Row 1: Ch 10, yoslst into the 2nd ch from hook and into each of the next 8 chains, slst into each of the next 2 sts, turn.
Row 2: skip the 2 slsts you just made, slstblo 9, turn.
Row 3: ch 1, yoslstblo 9, slst into each of the next 2 sts, turn
Rep rows 2-3 until you have reached the st before the nearest marker.
Next row: skip the 2 slsts you just made, slstblo 7, turn.
Next row: ch 1, yoslstblo 7, slst into each of the next 2 sts, turn.
Next row: skip the 2 slsts you just made, slstblo 5, turn.
Next row: ch 1, yoslstblo 5, slst into each of the next 2 sts, turn.
Next row: skip the 2 slsts you just made, slstblo 3, turn.
Next row: ch 1, yoslstblo 3, slst into each of the next 2 sts, turn.
Next row: skip the 2 slsts you just made, slstblo 1, turn.
Next row: ch 1, yoslstblo 1, slst into each of the next 2 sts, turn.
Next row: skip the 2 slsts you just made, slstblo 1, then insert hook into the side of the ‘bump’ below where your hook is now, then insert hook into next st, yo, pull yarn through all loops on hook, slstblo into next st, insert hook into side of bottom ‘bump’ and into the next st, yo and pull through all loops on hook, slstblo into next st, insert hook into side of bottom ‘bump’ and into the next st, yo and pull through all loops on hook, slstblo into next st, insert hook into side of bottom ‘bump and into the next st, yo and pull through all loops on hook, slstblo into the last st, turn.
Next row: ch 1, yoslstblo 9, slst into each of the next 2 sts, turn.
Next row: skip the 2 slsts you just made, slstblo 1, turn.
Next row: ch 1, yoslstblo 1, slst into each of the next 2 sts, turn.
Next row: skip the 2 slsts you just made, slstblo 1, then insert hook into the side of the bottom bump and then into next st, yo, pull through all loops, slst into next st, turn.
Next row: ch 1, yoslstblo 3, slst into each of the next 2 sts, turn.
Next row: skip the 2 sts you just made, slstblo 3, then insert hook into the side of bump then into next st, yo, pull through all loops on hook, slstblo in next st, turn.
Next row: ch 1, yoslstblo 5, slst into each of the next 2 sts, turn.
Next row: skip the 2 slsts you just made, slstblo 5, then insert hook into side of bottom bump and then into next st, yo and pull through all loops, slstblo into next st, turn.
Next row: ch 1, yoslstblo 7, slst into each of the next 2 sts, turn.
Next row: skip the 2 slsts you just made, slstblo 7, then insert hook into the side of the bottom bump, and into the next st, yo, pull through all opps, slstblo into the last st, turn.
Next row: Ch 1, yoslstblo 9, slst into each of the next 2 sts, turn.
Next row: skip the 2 slsts you just made, slstblo 9, turn.
Rep the last 2 rows until you have worked your way around the entire neckline. Slst the two ends of the ribbing together. Fasten off.
Weave in all ends. It is recommended that you block this vest. I find that blocking with a handheld steamer works perfectly. Blocking your work will relax the stitches giving your piece a nice and polished look.