Eriu Ribbed Cardigan – Free Crochet Cardigan Pattern

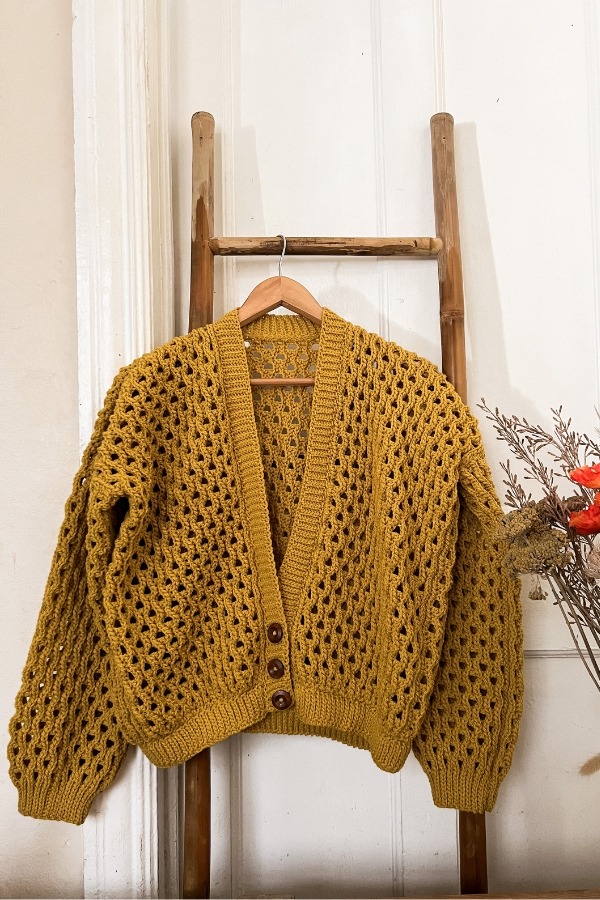
If you love the appearance of knitted garments but prefer the simplicity of crochet, the Eriu Ribbed Cardigan is a delightful project to add to your handmade wardrobe. Featuring beautifully pronounced vertical ribbing, a flattering cropped length and a classic button front fastening, this feminine cardigan combines the charm of traditional knitwear with the ease of crochet.
The secret to its distinctive knitted appearance lies in the stitch technique. By working half double crochet stitches through the back loops only, the cardigan develops a series of raised, closely spaced ridges that closely resemble knitted rib stitch. The result is a beautiful textured crochet cardigan with an attractive, polished finish.
Designed with a slightly oversized fit, the Eriu Cardigan has a relaxed shape without being excessively loose or bulky. Its shorter length pairs really well with high waisted jeans, tailored trousers or flowing dresses, while the neatly finished front opening and handmade crochet buttons add a lovely traditional touch.
One of the most appealing features of this free ribbed crochet cardigan pattern is its adaptability. Although the original design features a cropped length, you can easily adjust the starting chain to create a longer cardigan to suit your preferences.
With its uncomplicated construction, distinctive stitch work and understated details, the Eriu Ribbed Cardigan is an enjoyable project for anyone who wants to create a crochet garment with the refined appearance of knitted ribbing.

How the Eriu Cardigan is Constructed
The Eriu Ribbed Cardigan is worked sideways in five separate pieces, making its construction easy and particularly suitable for crocheters who are beginning to explore garment making.
Unlike traditional bottom up crochet cardigans, each piece begins with a foundation chain that determines its length. The number of rows worked establishes the width, allowing the cardigan to be customized without complicated shaping.
The design consists of one back panel, two front panels and two sleeves. Each piece is created using alternating between single crochet back loop only for the ribbed hem and continuing on with half double crochet back loop only for the main body. The transition between the two stitches is worked directly into each row, giving the finished pieces a continuous, structured appearance.
Once the panels are completed, the front and back pieces are joined at the shoulders. The sleeves are then attached, followed by the underarm and side seams.
To finish, a single crochet edging is worked along the front opening, incorporating three buttonholes. Three handmade crochet buttons complete the design, adding a charming finishing detail.
With no increasing or decreasing required, this beginner-friendly crochet cardigan pattern provides an approachable introduction to making garments from separate panels
Crochet Eriu Ribbed Cardigan at a Glance
- Skill Level: Easy
- Yarn Weight: Weight 4/ worsted
- Crochet Hooks: 5 mm & 3.5 mm
- Sizes: S(M, L, XL, 2XL, 3XL)
- Construction: Worked sideways in five separate pieces
- Main Stitches: Half double crochet, single crochet
- Texture: Pronounced knit-like ribbing
- Fit: Slightly oversized, with customized length
- Terminology: US crochet terms
Yarn & Materials
The Eriu Cardigan is designed using weight 4 yarn, making it a versatile project that can be recreated in a variety of yarn styles and colors.
For my cardigan I used Hobbii Fluffy Day, a lightweight feeling 100% acrylic yarn classified as weight 4. However, you can substitute another yarn of the same weight provided you achieve the correct gauge.
A smooth yarn can create a beautiful crisp, well defined ribbed texture, while a softer yarn will give the cardigan a more relaxed appearance. Whichever yarn you choose, the back loop only stitch technique remains the defining feature of this design.
Materials Required
- Yarn: Weight 4, Hobbii Fluffy Day (100% acrylic), 100g/ 285 m / 312 yds
- Yarn Quantity: Approximately 4(5, 5, 5, 6, 6) balls
- 5 mm crochet hook: For the main cardigan
- 3.5 mm crochet hook: For making the crochet buttons
- Stitch markers: Optional
- Yarn needle: For seaming, weaving in ends
Sizing & Measurements
The Eriu Ribbed Cardigan is available in six sizes, from S to 3XL, and is designed with a slightly oversized fit.
The measurements below refer to the finished cardigan:
| Size | Bust | Length | Sleeve Length |
|---|---|---|---|
| Small | 38″ | 18″ | 17″ |
| Medium | 42″ | 18.5″ | 17″ |
| Large | 46″ | 19″ | 17″ |
| X Large | 50″ | 19.5″ | 17.5″ |
| XX Large | 54″ | 20″ | 17.5″ |
| XXX Large | 58″ | 20.5″ | 18″ |
Gauge
16 stitches x 12 rows = 4 inches (10 cm), worked in hdcblo.
If your prefer a longer cardigan, simply increase the number of chains in your foundation row. Remember that adjusting the length may increase the amount of yarn required.
STITCHES & ABBREVIATIONS
- ch – chain
- sc – single crochet
- hdc – half double crochet
- blo – back loop only
- slst – slip stitch
- st(s) – stitch(es)
Purchase the Ad-Free PDF Pattern on Etsy
Prefer crocheting without interruptions? The Eriu Ribbed Cardigan pattern is also available as a convenient, ad-free PDF in my Etsy shop.
The downloadable pattern is perfect for printing or saving to your favorite device, allowing you to follow the instructions at your own pace without having to return to the website.
By purchasing the PDF, you’re also supporting my work as an independent crochet designer and helping me continue sharing free crochet patterns here on the blog.
Eriu Ribbed Cardigan Video Tutorial
If you prefer learning visually, you can follow along with my Eriu Ribbed Cardigan video tutorial on Youtube.
The tutorial is a helpful companion to the written pattern, particularly if you’re new to working garments sideways or creating knit-look ribbing using half double crochet back loop only.
Watching the stitch technique in action can make it easier to understand how the raised ridges develop and how the cardigan comes together.
Crochet Eriu Ribbed Cardigan Pattern
Back Panel
Ch 71( 73, 75, 77, 79, 81. This foundation chain determines the length of cardigan. Feel free to add more chains here for longer fit.
Row 1:
Sc in 2nd ch from hook, sc in next 7 chains, hdc in remaining chains. Turn.
Row 2:
Ch 1, BLO hdc in each st across until 8 sts remain, BLO sc in last 8 sts. Turn.
Row 3:
Ch 1, BLO sc in next 8 sc, BLO hdc in remaining sts. Turn.
Rep rows 2-3 until end of row 59( 65, 71, 77, 83, 89).
Fasten off.
Front Panel (Make 2)
Ch 71( 73, 75, 77, 79, 81
Row 1:
Sc in 2nd ch from hook, sc in next 7 chains, hdc in remaining chains. Turn.
Row 2:
Ch 1, BLO hdc in each st across until 8 sts remain, BLO sc in last 8 sts. Turn.
Row 3:
Ch 1, BLO sc in next 8 sc, BLO hdc in remaining sts. Turn.
Rep rows 2-3 until end of row 25(27, 31, 33, 35, 39).
Fasten off leaving a long tail.
Sleeves (Make 2)
Ch 68( 68, 68, 70, 70, 72).
Row 1:
Sc in 2nd ch from hook, sc in next 7 chains, hdc in remaining chains. Turn.
Row 2:
Ch 1, BLO hdc in each st across until 8 sc remain, BLO sc in next 8 sc. Turn.
Row 3:
Ch 1, BLO sc in next 8 sc, BLO hdc in remaining sts. Turn.
Rep rows 2-3 until end of row 41( 45, 49, 53, 59, 63).
Fasten off leaving a long tail.
Seaming Together
Lay the back panel on a flat surface. Next lay your two front panel on top of back panel. Using a yarn needle and your long tails seam across both shoulders.
Next lay entire piece ouf flat with wrong side facing up. Take a sleeve and fold in half lengthwise and mark the top of sleeve at the fold. This will be the centre of sleeve. Now with stitch marker still attached to sleeve you will now attach to shoulder seam. Using yarn needle and long tail seam sleeve to shoulder. Repeat on the other side for your second sleeve.
Now fold your cardigan over with wrong side still facing out. Seam along under edge of sleeves and down along sides of cardigan.
Turn cardigan right side out.
Attach yarn to the bottom inner edge of cardigan. Ch 1 and sc all the way around inner edge of cardigan until you reach other side. Turn.
Next 2 rows:
Ch 1, sc around inner edge. DO NOT FASTEN OFF.
With cardigan facing you, and on the right side, count 8 sc up, place first marker, count another 8 sc up and place second stitch marker, and finally count another 8 sc up and place your third stitch marker. This is where we will make button holes. Feel free to place your’s where you want.
Continuing on from where your hook is now:
Next Row:
Ch 1, sc in each st until you reach st before stitch marker, ch 3 (you may need to add more chains here according to size of button) skip st with stitch marker, sc in each st until you reach st before next st marker, ch 3, skip next st, sc in each st until you reach the stitch before you next and final stitch marker, ch 3, skip next st, sc in each st all the way around to the other side. Turn.
Next Row:
Ch 1, sc in each st around, making sure to place 3 sc in each of the buttonholes created. Turn.
Next Row:
Ch 1, sc in each st around. Fasten off.
Weave in all ends.
Buttons
Wrap yarn around index finger 6-7 times. With your 3.5mm hook insert into centre of hole, pull yarn through and ch 1. Make 70 sc in the centre of hole. Then slst into next available sc to close the round. Fasten off leaving long tail.
Insert tail end into yarn needle and make a few stitches at the back of button to close it entirely. Fasten off leaving long tail. Go ahead and make 2 more buttons.
Sew your buttons to cardigan. You are now finished your Crochet Ériú Cardigan. Enjoy!